Way to bite the bullet and start writing. Especially on a random week nonetheless. I'm very into starting things like this on the first of the month, yes I'm anal, but you...you just jump in on November 15...and to top it off it was a Tuesday! I'm so lucky to have you in my life to shake things up!
Well, first of all CONGRATULATIONS!! Even though I've known for how many weeks?!? I'm so excited the cutest little girl is going to have a handsome little brother! You are on your way to become the perfect nuclear family!
I cannot wait to decorate the nursery with you, and I am sure I will be in Tally early next year. It will be internet/in-person decorating. So is the plan to scour the internet for great ideas, post them to our Pinterest here and here and then write about the final product on Peach & Lass? I love the direction you are going in, and would expect nothing less than a Mad Men/Don Draper-esq nursery for your little man. You need to start look for a vintage bar cart to hold bubblegum cigarettes.
As Casa de Richman we've made some improvements over the past few months and a few more are on our list of to-dos.
1. The mantel has been given a facelift for the holidays
2. The upstairs guest bathroom has been given a facelift because it was boring and blah and borderline fugly
3. We are on our way to redoing the master bathroom...tile to be ordered this week! WOO HOO!
4. The dining room now has a table!! HOORAY!
5. I thrifted a fun chair for the master bedroom
6. I bought and repainted a mirror from Ikea for the guest room based on my inspiration
7. The dining room also has chairs
8. Something amazing is going to take place next month upstairs
I think that's about it, although I must admit I was hoping to write a #9 and #10. I told you I'm anal and stopping on #8 just seems weird. Promise to post pictures of the latest and greatest in the coming days/weeks.
Time to wrap this bad boy up. I leave you with these images just so you know where we left off last as far as master bath inspiration and vision. I am getting excited!!! Hope you are too!
Showing posts with label dining room. Show all posts
Thursday, November 17, 2011
Re: A Fond Farewell
Tuesday, August 2, 2011
Subject: TJ Maxx Drooling
Melissa -
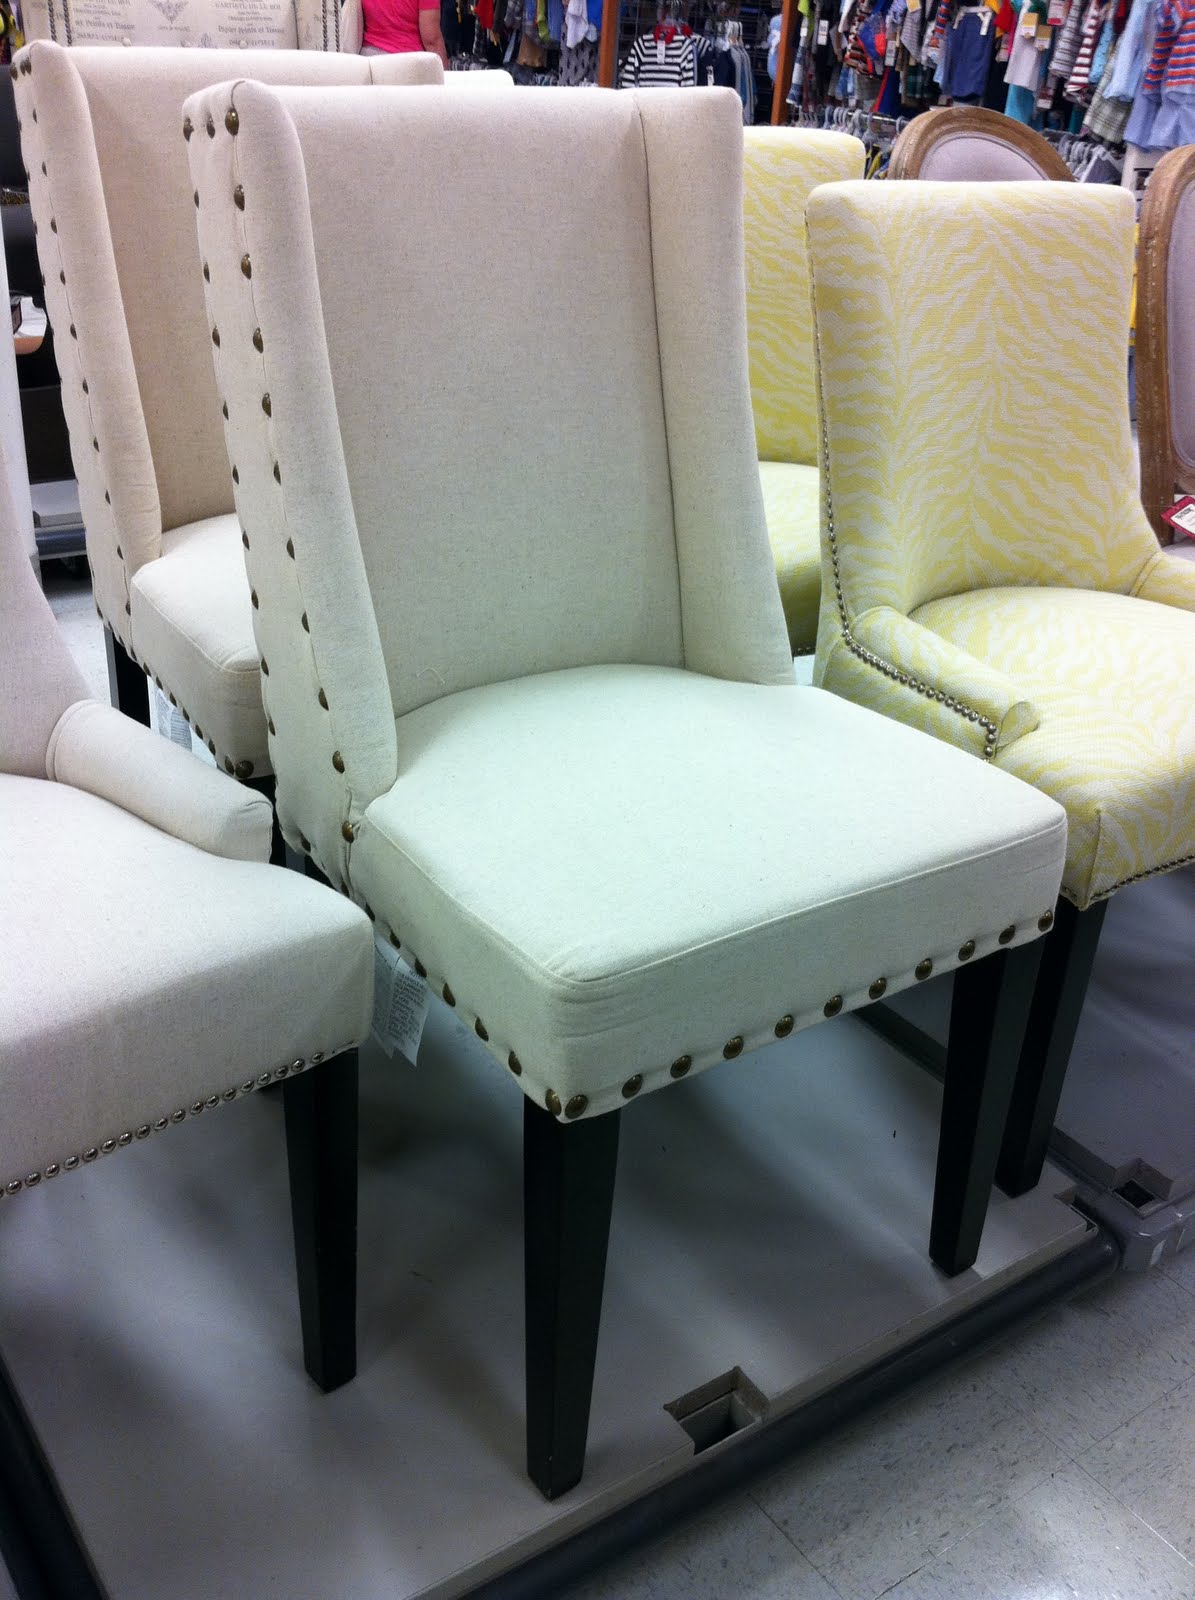
Living in a small town definitely has its drawbacks (only two Targets, one Michael's, no Home Goods!), but for some reason the furniture at the TJ Maxx is surprisingly good. I don't know if you have decided on dining room chairs to go with your new table (when you get it), but I fell in love with these:

I especially love the nail head trim as well as the fabric - it was almost like a linen. It just seemed really sophisticated, but the nail head made it feel more rustic and less formal. Plus it looks comfortable, which is so important if you want your guests to be comfortable and sit awhile. The price was great too - $149.99 each.
Living in a small town definitely has its drawbacks (only two Targets, one Michael's, no Home Goods!), but for some reason the furniture at the TJ Maxx is surprisingly good. I don't know if you have decided on dining room chairs to go with your new table (when you get it), but I fell in love with these:
Of course, there were only two available, but I'm sure with the entire metropolis of Atlanta at your disposal, you could track down enough!
So have you noticed a trend with my posts this week? While I'm gone, I'm emptying out my phone of pictures I meant to send you!
Xoxo,
Kara
Friday, June 24, 2011
Subject: Friday Round Up
Hey Kara,
A few things I realized I never touched base with you about.
1. This table is NOT being ordered.
![]() |
| Light Napa Dining Table |
World Market does not have wood samples and if I hate it, since it's an "online only item," I have to pay to ship it back. I even called the 1-800 number to see if the operator could compare the wood to another table they make, but no. He was a dope and basically had his thumb up his ass. What would the CEO of World Market think if he knew an employee working in customer service did anything but provide a service? I hope that CEO goes on Undercover Boss, works with Mr. No Customer Service and gives him a good talking to.
So, now I am thinking I am definitely going to get this table from Restoration Hardware.
![]() |
| Flatiron Dining Table |
However, I plan on waiting until November because that's when they have Friends & Family. Seems totally worth holding out for 20% off, right??
2. I have to say it...I hate fish tacos. I've never actually had them and I like fish, but the thought of fish and a taco...gross. I am sure the recipe is delish though and Hubby's mouth was watering when he read your post.
3. Cannot wait to see what you end up doing with your cupboard, hutch piece. Creamy white sounds good. One of my favorites is Glass of Milk by Martha. I used it in my guest bathroom downstairs. What about painting the pulls either the blue that you are going to use in the inside or metallic silver. I love the look of those antique pulls. And it seems to fit the style of the piece.
4. Regarding my chandelier, for now, I am leaving it white. I sprayed it myself. It was ugly brass, but now I think it's kind of cool. You can kind of see it in these pictures. There is something fun about the white with the white wainscoting.
5. Bought these. LOVE them. Will show you pictures next week.
![]() |
| Zoey Curtain Panel - Crate & Barrel |
![]() |
| An up close shot of the curtain |
Have a great weekend!! It's my last opportunity to prep before my best girls and their husbands come to town!!
Love,
Mel
Labels:
decorating,
dining room,
recipes,
The House of Peach
Friday, June 10, 2011
Subject: Dining Room - Mission Accomplished??
I think I found the remaining components to finish my dining room.
![]() |
| Cost Plus - Light Napa Dining Table |
![]() |
| Crate & Barrel - Slip White Side Chair |
![]() |
| Crate & Barrel - Zoey Curtain Panel |
Thursday, May 26, 2011
Re: Re: Re: Living Room Curtains, Parts 1 + 2
I made you something...
Knowing that you want a cottage-y, but not country house, this image that I came across earlier in the week, while actually hunting for a dining room table...still, was actually my inspiration.
![]() |
| Triangle Honeymoon via Lonny Magazine |
If you are going to do the ticking stripe curtains, I think the rug will be the room's statement piece, so my advice is to pick a WOW rug. I bought the rug in my foyer from Rugs USA. They are reasonably priced and always have discounts. You should definitely check there, too. I picked the one above in the storyboard just because I liked all the colors and it has blue to tie in the with chair and artwork.
Here are some other rugs I found on Rugs USA with the cottage-y, but not country feel:
For the other accents pictured, here's where they are from:
1. Target, Room Essentials Curtain Rod - I know you said you were having trouble finding rods, but I always get mine from here.
2. Pottery Barn, Bee Pillow Covers
3. Rugs USA, Couristan Applique Collection Summer Day Multi Rug
4. Pottery Barn, Circle Frame Pillow Cover - Love how you can monogram this oneWell, I cannot wait to see what you come up with!! I know the readers in cyberspace can't wait to see your new family room either.
Wednesday, May 18, 2011
Subject: Dining Room Decor UPDATE
The dining room decor is complete!! You wouldn't believe how hard it was to find the six matching frames. I won't even get into it, but thank you Hubs. (I begged him to swing by Target on more than one occasion after work!) Hope you love it as much as I do!
Tuesday, May 17, 2011
Re: Re: My New Dining Table
Hi! I hope you had a great weekend...we did! It was our sixth wedding anniversary, so we went away for the weekend (sans Suz) and stayed in Sandestin, which was really gorgeous and so relaxing. We ate at some amazing places and just enjoyed the sun and sand...plus lots of people-watching from behind the cover of my dark sunglasses. So all my thoughts and suggestions are coming from the mind of someone who is totally refreshed and rested, which will hopefully make them really useful!
Okay, so I am with you on loving the Grand Baluster Dining Table. The legs are gorgeous, but I completely agree with you - how impractical! Not only would you need to sharpen your tweezers, but it seems like it would be hard to keep clean too...would sauces or wine soak into the wood? Yikes and no thanks. Of the other two options, I really like the Flatiron Dining Table, which surprises me because I have always loved a farmhouse table with simple lines. But I really like the Flatiron Table. Maybe it's the combination of the wood where you can really see the grain and then the metal legs - it's an unexpected mix. You get the warmth of the wood but the industrial-ness of the legs. Plus, the legs on the other table just seemed really heavy to me. And with the Flatiron Table you could always pull up extra chairs for people to sit on the corners if you needed it, because there are no legs right on the corner for people to band their knees against!
So if you were to go with the Flatiron Table, you could go sooo many directions with the seating. I would be completely overwhelmed, so I'm glad it's you and not me making the decision! I'm just going to give you all my input (and a lot of pictures & links!) to hopefully get your design juices flowing!
I guess first you need to decide how formal you want to go. Also - how and if you want to incorporate color? Do you want to have the chairs nuetral but then upholster them in a colorful fabric? Do you want the chairs completely nuetral, and then bring in color with your linens and dishes? BTW - I love your dining room decor. The framed plates are such an amazing idea! Sorry for not responding sooner!
Here are a few photos I snapped from my Idea Notebook, all from Better Homes & Gardens.
I love how all these chairs are different (including the fabric), but they're unified by the stain:
I have also seen it where someone takes all different types of wooden chairs and paints them the same color to unify them, even though they're all different shapes and sizes. That's more of an informal, eclectic look, so I'm not sure that's what you're going for in here. In this room, I really like the mix of the yellow and green. And I love the frameless mirrors on the wall. It's actually given me an idea for something to do above my bed, so just keep this picture in mind for the future!
Okay, so I am with you on loving the Grand Baluster Dining Table. The legs are gorgeous, but I completely agree with you - how impractical! Not only would you need to sharpen your tweezers, but it seems like it would be hard to keep clean too...would sauces or wine soak into the wood? Yikes and no thanks. Of the other two options, I really like the Flatiron Dining Table, which surprises me because I have always loved a farmhouse table with simple lines. But I really like the Flatiron Table. Maybe it's the combination of the wood where you can really see the grain and then the metal legs - it's an unexpected mix. You get the warmth of the wood but the industrial-ness of the legs. Plus, the legs on the other table just seemed really heavy to me. And with the Flatiron Table you could always pull up extra chairs for people to sit on the corners if you needed it, because there are no legs right on the corner for people to band their knees against!
So if you were to go with the Flatiron Table, you could go sooo many directions with the seating. I would be completely overwhelmed, so I'm glad it's you and not me making the decision! I'm just going to give you all my input (and a lot of pictures & links!) to hopefully get your design juices flowing!
I guess first you need to decide how formal you want to go. Also - how and if you want to incorporate color? Do you want to have the chairs nuetral but then upholster them in a colorful fabric? Do you want the chairs completely nuetral, and then bring in color with your linens and dishes? BTW - I love your dining room decor. The framed plates are such an amazing idea! Sorry for not responding sooner!
Here are a few photos I snapped from my Idea Notebook, all from Better Homes & Gardens.
I love how all these chairs are different (including the fabric), but they're unified by the stain:
These chairs all match and are somewhat formal, but the tie on the cushion gives them some interest and are supposed to look like ribbons on ballet slippers:
These chairs are just really unique and I bet would be comfortable for a long family dinner (something to consider!). They remind me of those purses that are made out of seatbelt straps:

These chairs offer great texture, in my opinion. Plus you could swap out the cushions pretty cheaply if you wanted something different:
Speaking of texture, I really love a good woven chair. Here is one from Ikea that is a total steal at $79:
Here it is in action on the third season of Sarah's House (aka My Obession...did you see where Sarah's Cottage has started on HGTV??? Love it.):


I think it's a chair that could go really casual or dressy, depending on its surroundings, and Sarah made it work perfectly in her more formal dining room.
Another route you could go is to do some kind of bench or settee on one side, just to break up all the chairs a little bit. I love this example from Little Green Notebook:
For your table, you would need something longer, so a bench of some kind might be more economical, but I really love this idea. Or, you could keep a simple bench (almost like a picnic table bench) against a long wall in your dining room that seats more people than the number of chairs you have on one side, so when you have a crowd you could swtich out the chairs for the bench on that side. Just a suggestion.
Then there is the option of doing different chairs for the heads of the table. Sometimes I think this looks too grand and formal, but I found this example at BHG's website and I really love the way it looks:

Another route you could go is to do some kind of bench or settee on one side, just to break up all the chairs a little bit. I love this example from Little Green Notebook:
For your table, you would need something longer, so a bench of some kind might be more economical, but I really love this idea. Or, you could keep a simple bench (almost like a picnic table bench) against a long wall in your dining room that seats more people than the number of chairs you have on one side, so when you have a crowd you could swtich out the chairs for the bench on that side. Just a suggestion.Then there is the option of doing different chairs for the heads of the table. Sometimes I think this looks too grand and formal, but I found this example at BHG's website and I really love the way it looks:

Or you could do something kind of mod and retro with these Herman Miller chairs, also courtesy of BHG online:

I like how the table is really traditional and farmhouse-y, but the chairs are so not. It's an interesting combination that is sort of appealing.

I like how the table is really traditional and farmhouse-y, but the chairs are so not. It's an interesting combination that is sort of appealing.
I feel like at some point in one of our conversations (actual conversations, not just virtual) you talked about doing upholstered chairs, so I could be missing the mark altogether here. But wasn't this fun? I love looking at pictures of other people's houses, even if I'm not actually going to use any of those ideas!
I can't wait to see what you decide!
Xoxo,
Kara
Friday, May 13, 2011
Re: My New Dining Table
Wow - Feels like FOREVER since I've blogged. Work, work, work. Enough about that though. Your dining room table looks BEAUTIFUL!! I've known all along that your plan was to paint it white, but had no idea how the fully transformed piece would look. I LOVE IT!! You should be so proud of yourself. Your kitchen/dining area has really been transformed over the past few months.
Here at The House of Peach, we are still in search of the perfect dining table. At one point I had my eye on this beauty:
![]() |
| Grand Baluster Dining Table |
However, after visiting the table multiple times in the store, I realize the rough, unfinished top (that Hubby hates and Mama isn't a fan of) is not only impractical, but a bit painful, too. Hello splinters!
Lately, I've been debating between these two:
![]() |
| Flatiron Dining Table |
![]() |
| 1900's Boulangerie Dining Table |
I need to go see them in person though and haven't been back to the store since I vetoed the original table.
At one point, I thought this was going to be the winner:
![]() |
| Pottery Barn Hyde Dining Table - No Longer Available |
But in person the "wood" wasn't for me. It looked way too manufactured for the look I am going for.
Tuesday, May 3, 2011
Subject: My New Dining Table
Melissa -
This post has been a long time coming! I first told you about my dining table here, when I asked you to go pick it up for me. Yes, I search Craigslists in other cities where I have friends/family in the hopes that if I find something, they can get it for me and then I can figure out a way to retrieve it. So, the table is originally from Atlanta. Then my cousin, who lives in Charleston, told me she was going to the SEC basketball tournament in Atlanta and agreed to get the table from you, Peach, and take it back to Charleston. I was hoping that her mom (my aunt) would be able to bring it back down when she came, but it would not fit in her car. So then, about a month later, my uncle drove up there in a big SUV for my cousin's son's 1st birthday party (my second cousin, I think?), and he brought it back for me. It was quite a production getting it down here, but it was so worth it once you see the finished product and now it has earned the name "tri-state table!"
So, here it is before:

This post has been a long time coming! I first told you about my dining table here, when I asked you to go pick it up for me. Yes, I search Craigslists in other cities where I have friends/family in the hopes that if I find something, they can get it for me and then I can figure out a way to retrieve it. So, the table is originally from Atlanta. Then my cousin, who lives in Charleston, told me she was going to the SEC basketball tournament in Atlanta and agreed to get the table from you, Peach, and take it back to Charleston. I was hoping that her mom (my aunt) would be able to bring it back down when she came, but it would not fit in her car. So then, about a month later, my uncle drove up there in a big SUV for my cousin's son's 1st birthday party (my second cousin, I think?), and he brought it back for me. It was quite a production getting it down here, but it was so worth it once you see the finished product and now it has earned the name "tri-state table!"
So, here it is before:
It is a solid oak table that I got for $100, which felt like a great price considering the guy said he hardly ever used it and it was in really great shape. It came with a leaf, which I planned to keep in it so all six of my dining chairs would fit around it. It actually measures slightly bigger than the table I had before, which was nice to for having people over - I could always add more chairs since there were no corners to contend with.
The only problem with keeping the leaf in is you can see in the picture above that the trim on the leaf doesn't match the rest of the table. When I originally got the table, the leaf had no trim and I didn't like the way it looked. So I went to Home Depot and had them cut me two pieces of 12-inch-long oak that was the same height as the existing trim around the table. Thankfully, the trim is plain so I didn't have to try and match it up with a piece that had grooves on it or anything. I was also pretty proud of myself because I went to The Depot all by myself and picked out the wood and had it cut. I paid about $3 for both pieces, which felt like a steal. I used L-brackets and screws (which I also picked out myself) to attach the new pieces to the leaf:

The only problem with keeping the leaf in is you can see in the picture above that the trim on the leaf doesn't match the rest of the table. When I originally got the table, the leaf had no trim and I didn't like the way it looked. So I went to Home Depot and had them cut me two pieces of 12-inch-long oak that was the same height as the existing trim around the table. Thankfully, the trim is plain so I didn't have to try and match it up with a piece that had grooves on it or anything. I was also pretty proud of myself because I went to The Depot all by myself and picked out the wood and had it cut. I paid about $3 for both pieces, which felt like a steal. I used L-brackets and screws (which I also picked out myself) to attach the new pieces to the leaf:
Once I had all that done, I got to the business of re-finishing. First I used Liquid Sandpaper to take the finish off the table to ensure the paint would then stick. I like Liquid Sandpaper because it's quicker than using actual sandpaper, plus it combines the step of cleaning the piece while sanding it. I applied it using a piece of an old T-shirt and wore gloves when working with it, which is so important. Liquid Sandpaper is available in the sandpaper section at most hardware stores and looks like this:


After the sanding step, I then primed it. I used Behr Premium Primer & Sealer because that's what I had on hand. I didn't have long stretches of time to work on this project, so the primer dried for about 24 hours before I started painting. I think it's important to wait an ample amount of time between each step - read the directions on your product - but sometimes I get impatient and rush things. So it was good that I had a finite amount of time each day to work on this project.
After priming, I then applied my paint. I used white trim paint that I also had on hand. For furniture, I always use latex paint and I think a semi-gloss finish is just right, so that's what I used. I applied 3-4 coats of paint, waiting for each coat to dry before applying the next. My dad advised me that oak is a thick wood and the grains of wood can sometimes bleed through the paint, so I was determined to put on as many coats as were necessary. Plus, I knew this piece would be heavily used, so I wanted to make sure it had plenty of coats for that reason as well.
Once I had my coats of paint, I then I applied a protective layer of polyurethane. There is a relatively new product called Wipe-On Poly by Minwax that is awesome and that I used on this project. You just wipe on the polyurethane with a rag (and gloves!). It comes in a glossy or satin finishes and the container looks like this:
After priming, I then applied my paint. I used white trim paint that I also had on hand. For furniture, I always use latex paint and I think a semi-gloss finish is just right, so that's what I used. I applied 3-4 coats of paint, waiting for each coat to dry before applying the next. My dad advised me that oak is a thick wood and the grains of wood can sometimes bleed through the paint, so I was determined to put on as many coats as were necessary. Plus, I knew this piece would be heavily used, so I wanted to make sure it had plenty of coats for that reason as well.
Once I had my coats of paint, I then I applied a protective layer of polyurethane. There is a relatively new product called Wipe-On Poly by Minwax that is awesome and that I used on this project. You just wipe on the polyurethane with a rag (and gloves!). It comes in a glossy or satin finishes and the container looks like this:
For this project, I used the satin finish. Once the first coat has dried, you sand it with a fine-grain sandpaper, wipe it down and then apply another coat. Originally I was only going to do two coats on the top, but then I realized that people's feet would probably kick the pedestal and potentially chip it, so I applied two coats of the poly there too.
So after all that was done, I moved the table into the kitchen and put it together and voila! all done:
I love how it looks, with the wall color and the chair fabric and the tile. It is seriously such an improvement. Here is a picture of the dining area before, when it was green:
And here is the whole area now:

I looooooove it. I think the whole look is so much more refined and has so much more focus - like I actually had a plan beforehand and thought it all through! There are more details from this dining area to show you, but I'm exhausted from telling you about this table, so I will save it for another day!
Toodles,
Kara
Thursday, April 21, 2011
Subject: Dining Room Decor
Your priming update inspired me to provide you with an update of one of my latest projects. (By the way, love that the table is coming along!)
So, before purchasing a dining room table, I was pretty much set on what I wanted to hang on the walls of the dining room...plates!! I always knew I wanted plates somewhere in my house, and since the kitchen has very minimal empty wall space the dining room seemed like the next best alternative.
I fell in love with the Petite Fille Plate from Anthropologie and was happy to learn there were a whole slew of plates that coordinated with it.
I didn't just want to hang them though. I needed something fun and dramatic. Thanks to inspiration right from Anthro - here's an idea of where I'm at:
I bought frames from Target, took out the glass and left the backs off. Please note, the plan is to add two more frames to the top so it's three and three, but after going to four Targets I'm waiting for them to stock up again. (I found what would have been the last two needed in fourth and final last Target I stopped at, but they were all scratched. So annoying!)
Here's an upclose shot. I love how the frame molding mimics the wainscoting.
I'll be sure to send you pictures once it's 100% complete.
So, before purchasing a dining room table, I was pretty much set on what I wanted to hang on the walls of the dining room...plates!! I always knew I wanted plates somewhere in my house, and since the kitchen has very minimal empty wall space the dining room seemed like the next best alternative.
I fell in love with the Petite Fille Plate from Anthropologie and was happy to learn there were a whole slew of plates that coordinated with it.
![]() |
| Anthropologie - Petite Fille Plate |
I bought frames from Target, took out the glass and left the backs off. Please note, the plan is to add two more frames to the top so it's three and three, but after going to four Targets I'm waiting for them to stock up again. (I found what would have been the last two needed in fourth and final last Target I stopped at, but they were all scratched. So annoying!)
Here's an upclose shot. I love how the frame molding mimics the wainscoting.
Then I purchased these really cool plate hangers from Amazon. They take a little time to put on, between washing the plates, sticking the hangers on the back by wetting the magic glue they have on them and letting them try, but I love how you can't see them from the front.
And here's where I am so far...
I'll be sure to send you pictures once it's 100% complete.
Subscribe to:
Posts (Atom)